Core77 published a great list of ways to lower the cost of your CNC parts. While they describe machining metals most all the concepts are applicable to other materials. We thought it was too good not to share in full below:
Introduction
Whether you are looking to create a single prototype or you are ready for large-scale production, cutting manufacturing costs is often the main priority when it comes to CNC machining.
Luckily, your decisions as the designer can greatly affect the final pricing. By following the Design for Machinability tips of this article, you can manufacture parts that are optimized to minimize costs and still comply with your design requirements.
We first examine what drives costs in CNC machining. Next, an extensive list of actionable guidelines to reduce cost of CNC machined parts is presented.
If you are not sure whether CNC machining or 3D printing is best for your application, this article can help you decide.
What affects the cost of CNC parts?
The price of CNC machined parts depends on the following:
Machining time: The longer it takes to machine a part, the more expensive it will be. Machining time is often the main cost driver in CNC.
Start-up costs: These are related to CAD file preparation and process planning and are significant for smaller volumes. This cost is fixed and there is an opportunity to reduce the unit price by taking advantage of "economies of scale".
Other manufacturing costs: When you design parts with special requirements (for example, when you define tight tolerances or design thin walls), then special tooling, closer quality control, and more processing steps - at lower machining speeds - may be required. This, of course, has an impact on the total manufacturing time (and the price).
Now that it is clear where the cost of CNC comes from, let's see how a design can be optimized to minimize it...
Tip #1: Add a Radius in Internal Vertical Edges
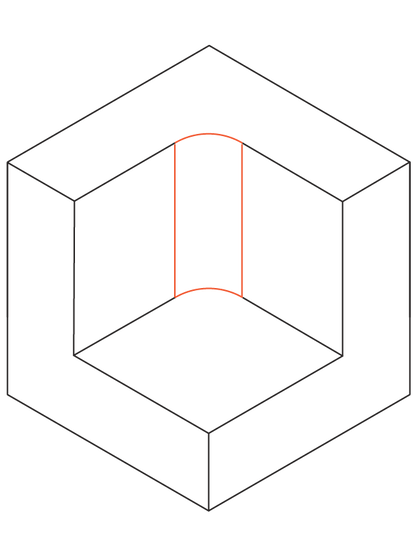
Add internal radii at internal corners of at least 1/3 of the depth of the cavity
All CNC milling tools have a cylindrical shape and will create a radius when cutting the edge of a pocket.
Corner radius can be reduced by using a tool with a smaller diameter. This means though that multiple passes at lower speed will be required - smaller tools cannot remove material in one pass as fast as larger tools - increasing the machining time and cost.
To minimize cost:
Add a radius of at least 1/3 of the depth of the cavity (the larger the better).
Preferably, use the same radius in all internal edges.
On the floor of the cavity, specify a small radius (.5 or 1 mm) or no radius at all.
Pro Tip: Ideally, the corner radius should be slightly larger than the radius of the tool that will be used to machine the cavity. This reduces the loads on the tool and will further reduce your manufacturing costs. For example, if your design has 12 mm deep cavity, add a 5 mm (or larger) radius at the corners. This will allow a ø8 mm tool to cut them at a faster speed.
Tip #2: Limit the Depth of Cavities

Limit the depth of cavities to 4 times their length
Machining deep cavities affects the cost of CNC parts dramatically, as a lot of material needs to be removed, which is very time-consuming.
It is important to keep in mind that CNC tools have a limited cutting length: typically they will work best when cutting cavities with a depth of up to 2-3 times their diameter. For example, a ø12 milling tool can cut cavities safely up to 25 mm deep.
Cutting deeper cavities is possible (up to 4x the diameter of the tool or greater), but this will increase the cost, as special tooling or multi-axis CNC systems are required.
When cutting a cutting a cavity, the tool has to ramp into the correct cutting depth. Smooth entrance requires sufficient space.
To minimize cost:
Limit the depth of all cavities to 4 times their length (i.e. largest dimension on the XY plane).
Don't forget to adjust the internal corner radii according to Tip #1 (if needed).
Tip #3: Increase the Thickness of Thin Walls

Increase the thickness of thin walls to reduce the machining time
Unless weight is a major factor, thick solid sections are more stable (and less costly to machine) and should be preferred.
To avoid deformation or fracture when machining a thin wall, multiple passes at low cutting depths are required. Thin features are also very prone to vibrations, so machining them accurately is challenging and increases the machining time considerably.
To minimize cost:
For metal parts, design walls thicker than 0.8 mm (the thicker the better).
For plastic parts, keep the minimum wall thickness above 1.5 mm.
Note: The minimum achievable wall thickness for metals is 0.5 mm and for plastics 1.0 mm. The machinability of these features must be accessed on a case by case basis though.
Important: Thin walls are commonly encountered when placing hole (and threads) very close to the edge of the part. Make sure that you follow the above guidelines also when you position holes in your design.
Tip #4: Limit the Length of Threads

Limit the maximum length of threads to 3 times the hole diameter
Specifying threads that are longer than necessary can increase the cost of CNC parts, as special tooling may be required.
Keep in mind that threads longer than 1.5 times the diameter of the hole do not actually add to the strength of the connection.
To minimize cost:
Design threads with a maximum length of up to 3 times the hole diameter.
For threads in blind holes, it is preferable to add at least 1/2 diameter of unthreaded length at the bottom of the hole.
Tip #5: Design Holes with Standard Size

Use standard drill sizes when designing holes
Holes can be CNC machined fast and to a great accuracy using standard drill bits. For non-standard sizes, the hole must be machined using an end mill tool, potentially increasing the cost.
Also, limit the depth of all holes to 4 times their diameter. Deeper holes (up to 10 times the diameter) can be manufactured, but they will likely increase the cost, as they are problematic to machine.
To minimize cost:
Design holes with with diameter that is an increment of 0.1 mm for diameters up to 10 mm and 0.5 mm above that.
When designing in inches, use conventional fractions of an inch or refer to this table of fractional-inch drill bit sizes.
Tip #6: Specify Tolerances Only when Necessary

Specify tolerances only when necessary
Defining tight tolerances raises the cost of CNC, as it both increases the machining time and requires manual inspection. Tolerances should be defined sparingly and only when necessary.
If a specific tolerance is not defined on the technical drawing, then the parts will be machined using the standard tolerance (± 0.125 mm or better), which is sufficient for most non-critical features.
To minimize cost:
Specify tighter tolerances only when necessary.
Define a single datum (for example the cross section of two edges) as reference for all dimensions with tolerances.
Tip #7: Keep the Number of Machine Setups to a Minimum

Example of part that requires more than one machine setups
It is recommended to design parts that can be machined in as few machine setups as possible and preferably in only one setup. For example, a part that has blind holes on both sides will be machined in two setups, as it needs to be rotated to get access to both sides.
Rotating or repositioning the part adds to the manufacturing cost, as it usually needs to be done manually. Moreover, for intricate geometries a custom fixture might be required, further increasing the cost. Especially complicated geometries may require a multi-axis CNC system, further increasing the price.
Consider splitting the part into geometries that can be CNC machined in a single setup and that can be bolted or welded together later. This is also applicable for parts with very deep pockets.
To minimize cost:
Design parts with a 2.5D geometry that can be manufactured in a single CNC machine setup.
If this is not possible, separate the geometry into multiple parts that can be assembled later.
Tip #8: Consider the Cost of the Bulk Material
The cost of the bulk material is another factor that can greatly affect the price of the CNC machined parts.
The table below summarizes the price of metal alloys and plastic materials commonly used in CNC for a sheet with dimensions of 6'' x 6'' x 1'' (or approximately 150 x 150 x 25 mm).
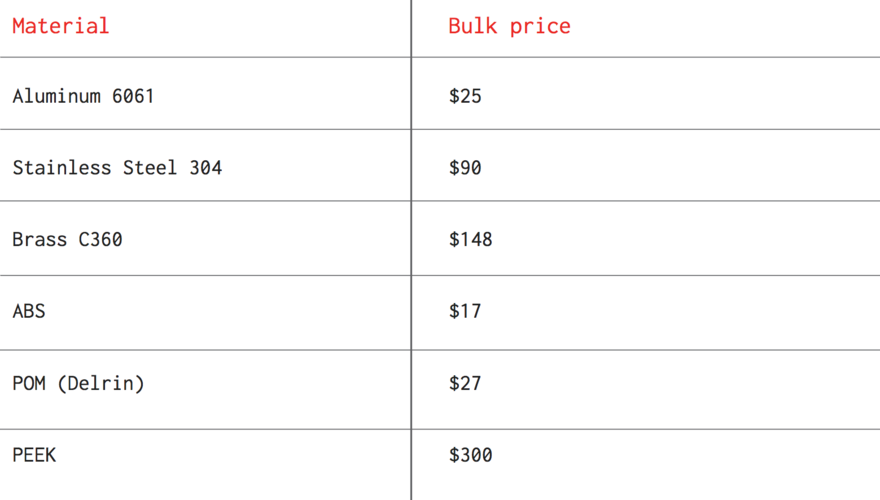
Source: McMaster
Aluminum 6061 is clearly the most cost-effective way of creating metal prototypes as it combines low cost and very good machinability. Stainless Steel and Brass are more expensive options and should be used only when their material properties are required.
When it comes to plastics, ABS and POM (Delrin) are priced approximately the same as Aluminum 6061. They are more difficult to machine though, so expect the price to be higher. PEEK is a very expensive material and should be used only when necessary.
To minimize cost:
? Choose a material with low bulk cost (especially you are in the prototyping stage).
Extra Tip: Take Advantage of Economies of Scale
In CNC machining, the quantity greatly affects the unit price. This is because the setup costs are relatively high and, for a single prototype or a few parts, they represent a big percentage of the cost.
When the volumes increase, the setup costs get almost eliminated, as they are spread over many parts.
In the graph below, we summarized the average unit price of 12 different parts machined in Stainless Steel:
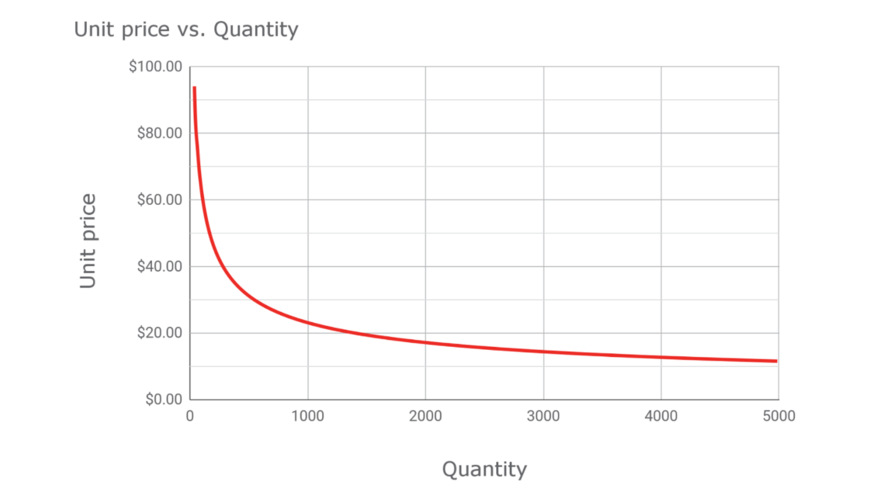
The drop in unit price is almost exponential, meaning that even a small increase in quantity can decrease the unit price by a lot. Notice that ordering very high volumes (> 1000 parts) reduces the unit price by 5 to 10 times!
The effect of quantity is prominent even in small volumes. Actually:
Increasing the quantity from 1 to 5 can decrease the unit price by more than 50%!
To minimize cost:
Take advantage of economies of scale by ordering higher quantities.
In Conclusion: Keep it simple…
Complexity has a high cost in CNC: geometries that require special tooling or fixtures, multiple machine setups or specialty materials will cost considerably more.
The tips of this article will help you get started. For 7 more advanced design tips, please refer to the article here.
*****
3D Hubs is the world's largest network of manufacturing services. With production facilities connected in over 140 countries, the 3D Hubs online platform helps you find the fastest and most price-competitive manufacturing solution near you. Founded in 2013, the network has since produced more than 1,000,000 parts locally, making it the global leader in distributed manufacturing.